PASCHIMATANASANA
(The Posterior Stretch Pose)
 |
| Paschimatanasana |
PASCHIMATANASANA
(The Posterior Stretch Pose)
In someanas the body gets stretched. Stretching and pulling of the body and spinal column is achieved in various ways. In Tadasana, the entire body gets stretched in the standing position, while in Parvatasana, the upper portion of the body gets a pull in the sitting position. In Supta Vajrasana, there is a stretch and pull on the anterior side of the body. However, in Paschimatanasana the whole back side of the body including the spinal column gets a stretch.
In Sanskrit, the sides of the body have been given different names. The back portion of the body is called the ‘Paschima' side. In this Asana, the back side of the body is stretched right from the toes to the head; as such this Asana is appropriately called Paschimatanasana.
Contraindications : Acute abdominal pain or back pain, spondylosis, lumbago, hernia or hydrocele.
Leading and Preparatory Practices : Persons of middle or advanced age may find it pretty hard to achieve the final stage of this Asana. Therefore, before practising Paschimatanasana, it is advisable to practise Ardha Paschimatanasana or Janushirasana followed by Sulabha Paschimatanasana for a few days. Once the technique of these postures is mastered, the practice of Paschimatanasana becomes easier. If Ardha
Paschimatanasana or Janushirasana are also difficult, one can first practise Hastapadasana and Ek-pada-hastasana for some days, which will facilitate the practice of the other two Asanas. The details regarding these leading and preparatory practices are given below.
HASTAPADASANA (The Hands-to-Feet Pose)
Starting Position : Stand erect. Keep some distance (of approx. 30 - 50 cms.) between the feet (fig. 1).
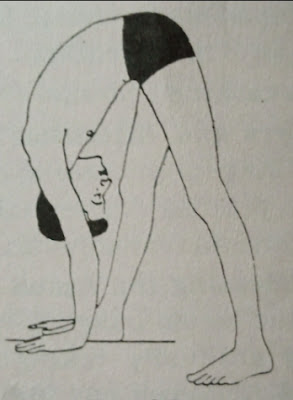
Technique of Attaining the Asana: Raise the hands above the head and tilt the body a little backward, keeping the hands straight (fig. 2). Now keeping the knees straight, start bending forward slowly from the waist. Keep the chin up while your forward bending continues. Once the limit is reached, relax the upper portion of the body including the head and let it hang down making an inverted 'U' of the body as in fig. 3A. This is the final stage of Hastapadasana. Keep this posture for 3 to 5 breaths.
Breathing : Normal.
Eyes and Attention : In the final stage of the Asana, close the eyes, practise differential relaxation and do Pranadharana.
Releasing the Asana : Keeping the hands hanging, raise the body gradually taking up the trunk, the neck and the head in that order.
Fig. 1
 |
| Paschimatanasana |
Fig. 2
 |
| Paschimatanasana |
The hanging arms will come back to their normal position automatically along with the shoulders, so don't raise them, just keep them relaxed as they are.
Practice : Initially 3 to 5 rounds of 3 to 5 breaths each. After some practice perform only one round of 5 to 20 breaths.
 |
| Paschimatanasana |
Probable Mistakes
Bending the legs at knees while maintaining the final stage.
- Taking up the arms whilec out of the Asana.
Correction
- Keep the legs straight at knees.
- Let the arms remain hanging coming out of the Asana. while releasing the posture.
After good practice of this Asana, one can perform Hastapadasana keeping the heels and toes together.
EK-PADA-HASTASANA (The Hands-to-One-Foot Pose)
There is only one point of difference between the technique of this leading practice and that of the previous one, i.e. after you stand in the starting position, with both the legs symmetrical, you should put one foot forward by 12 inches or so. The rest of the bending operation is to be done similarly so that the upper portion of the body including the head and hands hang down as in fig. 3B. This is the final stage of Ek-PadaHastasana. Close the eyes, practise differential relaxation and do Pranadharana. Keep this posture for 3 to 5 breaths.
Fig. 3A
 |
| Paschimatanasana |
 |
| Paschimatanasana |
In this Asana, you'll experience greater stretch along the hamstring muscles of the leg that is put forward. Take care that both the legs remain straight at knees and the stretch is bearable. Release the Asana by gradually taking up the trunk, the neck and the head in that order, keeping the hands
hanging. As in Hastapadasana, in this Asana too the hanging arms will come back to their normal position automatically along with the shoulders.
Repeat the above process with the other foot forward and maintain the final stage for 3 to 5 breaths. This completes one round of Ek-Pada-Hastasana. Perform 2 to 4 rounds.
JANUSHIRASANA (The Knee-to-Head Pose)
Starting Position : Sit with the legs spread in front (fig. 4 Technique of Attaining the Asana : Keeping the right leg straight, fold the left leg in such a manner that its sole touches the right thigh, while the heel comes near the groin. Keep both the palms on the right thigh. Push the chin forward and up. Relaxing the trunk, slide the palms down the leg while bending gradually from the waist. Loosen up the upper portion of the body and let the torso go as far as it can. Simultaneously, let the palms slide towards the toes. Now catch hold of the right sole with the interlocked fingers and let the forehead come down and rest on the right knee. This is the final stage of Janushirasana one way (fig. 5).
Fig. 4
 |
| Paschimatanasana |
Fig 5.
 |
| Paschimatanasana |
In case the palms do not reach upto the toes, rest the palms at the limit of their reach. Similarly, if the forehead does not reach down to the knee, keep the head relaxed and steady at the limit of its reach. Maintain the final stage for 3 to 10 breaths.
Breathing : Normal.
Eyes and Attention : In the final stage of the Asana. close the eyes, practise differential relaxation and fix the attention on the breathing, i.e. do Pranadharana.
Releasing the Asana : To come out of the Asana, perform these operations in reverse order.
Repeating the process exchanging the position of legs completes one round of Janushirasana.
Practice : 2 to 4 rounds of 6 to 10 breaths each.
ARDHA PASCHIMATANASANA (The Semi Posterior Stretch Pose)
Starting Position : Sit with the legs spread in front (fig. 6). Technique of Attaining the Asana : Keep the legs together, with toes, heels, ankles and knees touching each other. Keep the hands on the floor (fig. 7).
Fig. 6
 |
| Paschimatanasana |
Fig. 7
 |
| Paschimatanasana |
Next, fold both the legs and bring the knees near the chest. Rest the heels on the floor, the toes pointing upwards. Form both the index fingers into hooks and hold the respective big toes with them. While you do this, both the hands should be on the outer side of the legs. Keep the back straight (fig. 8). Now, without loosening the hold of the toes unfold the right leg slowly. When the leg goes forward, the right hand will also go forward along with it. Also, the torso will start leaning forward. If the stretch on the body is tolerable, continue
unfolding the leg till the leg is fully straightened out (fig. 9). However, if it is difficult to attain this position, stop unfolding the leg at the limit of tolerability. In other words, unfold the leg only to your capacity. When the final position (which could be a half-way position, governed by your capacity) is attained, relax the torso and let the head come down under gravity. This is the final stage of Ardha Paschimatanasana done with the right leg straight.
Maintain this posture for 3 to 5 breaths according to your capacity
Fig. 8
 |
| Paschimatanasana |
Fig. 9
 |
| Paschimatanasana |
Breathing : Normal.
Eyes and Attention : In the final stage of the Asana, close the eyes, practise differential relaxation and do Pranadharana.
Releasing the Asana : For attaining the other half of this Asana, fold the right leg so as to reach the posture in fig. 8 and repeat the
Fig. 10
 |
| Paschimatanasana |
operations exchanging the position of legs. This will lead to the final stage of Ardha Paschimatanasana done with the left leg straight (fig. 10). The two postures together constitute one
round of Ardha Paschimatanasana. Now for coming out of the Asana, fold the left leg to reach the posture in fig. 8, unlock big toes keeping the palms on the floor and straighten both the legs to attain the starting position (fig. 6). Practise : 2 to 4 rounds of 6 to 10 breaths each.
PASCHIMATANASANA (The Posterior Stretch Pose)
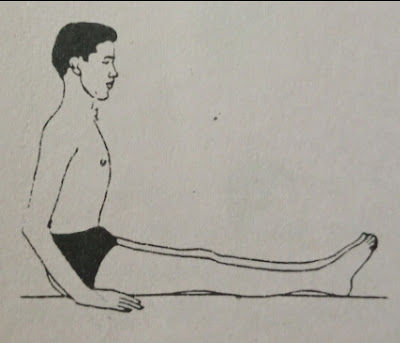
Starting Position : Sit with the legs stretched out in front, with toes, heels, ankles and knees touching each other (fig. 11).
Technique of Attaining the Asana : Keep the palms on the respective thighs. Take the chin forward and up. Relaxing the trunk, slide the palms down the legs and bend gradually at the waist. Loosen the muscles of the torso and let it go as far as it can, bearably. Simultaneously, take the palms towards the toes. Form the index fingers into hooks, catch hold of the respective big toes and relax the upper body (fig. 12). In case the fingers do not reach upto the toes, one may keep the palms relaxed at the point they have reached.
Fig. 11
 |
| Paschimatanasana |
Fig. 12
 |
| Paschimatanasana |
The trunk and hands should be further relaxed. This will result in the upper portion of the body leaning forward and going downward. Finally, the hands will bend at the elbows (fig. 13). This stage is called Sulabha Paschimatanasana,
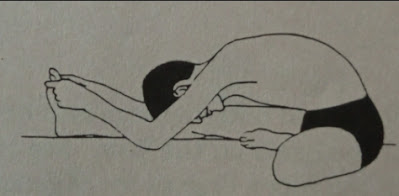
1.e. the Easy Posterior Stretch Pose, which can also be practised as an independent leading practice. Continue this process of relaxing the upper portion of the body as far as you can. Under gravity, the torso, the head and the hands will go down as far the flexibility of these parts permits. Ideally, the forehead should rest on the knees and the elbows touch the floor (fig. 14). This is the final stage of Paschimatanasana. Maintain the posture for 3 to 10 breaths.
Fig. 13
 |
| Paschimatanasana |
Fig. 14
 |
| Paschimatanasana |
Breathing : As usual, maintain normal breathing. In the final stage there is a tendency to contract the abdominal muscles and hold the breath owing to one's competitive spint and perseverance misapplied. Beware of these tendencies and consciously keep the breathing on.
Eyes and Attention : Close the eyes, practise differential relaxation; feel the pressure on the abdominal region and finally keep the mind on the breathing, 1.e. do Pranadharana.
Releasing the Asana : First take the chin and head up, straighten the arms, free the toes and slowly start taking the head and the shoulders back. Go on raising the trunk. Simultaneously let the palms return to their original position, 1.e. on the thighs. Thus come back to the starting position (fig. 11) and relax
Practice : In the beginning, practise 3 to 5 rounds of 3 to 10 breaths each. After good practice, maintain this Asana for one round of 1 to 5 minutes (1.e. approx. 15 to 75 breaths).
Probable Mistakes
- Making the forehead touch the knees by jerky movements of the upper portion of the body or by using force, taking advan- tage of the grip of the toes or legs or by contracting the abdominal muscles.
- Bending legs at the knees.
NOTES :
Correction
- Such tendencies should be consciously avoided. Instead of using force for reaching the ideal final stage of the Asana, it is advisable to make a thorough practice of the preparatory practices.
- Bending legs at the knees will defeat the purpose of this posture. Hence, bending of knees at any stage should be avoided.
1. In the final stage of Paschimatanasana, certain parts of the body experience a stretch or pull beyond their flexibility, The stretch or pull is more at the back of the knees (hamstring muscles) and in the waist region. Assume a body position in which the stretch or pull is tolerable and pleasurable. One should not assume an unpleasurable and strained posture by force.
2. Achieving the final stage of Paschtmatanasana depends on many factors such as age, rigidity of the body, fatty deposits in the abdominal region, the relative lengths of the upper and lower parts of the body. Persons whose legs are longer in rela tion to the upper portion of the body will find it difficult to attain the ideal final posture of Paschimatanasana. Such persons should perform the Asana by relaxing the upper portion of the body and consider whatever comfortable and pleasurable posture they achieve (without bending the knees) as the final stage for them, no matter whether the head comes near the knees or not.
3. In Paschimatanasana, stretch and pull are created on the back side but the front side is Inactive. It merely reacts to the posterior stretch and pull. The opposite takes place in Supta Vajrasana : there is a stretch and pull on the anterior side while the inactive back side merely reacts. Thus, these two poses are mutually complementary. Hence, they should be practised one after the other. Thereby, the benefits and pleasure of both can be maximised. In Paschimatanasana, muscle stretch is felt at the waist, the back, the neck and the back side of the knees while in Supta Vajrasana muscle stretch is experienced along the abdomen, the chest, the thighs, the ankles and the front side of the knee joints, etc. These two poses together give an optimum tone and elasticity to the muscles of both the sides. Hence, the pair is strongly recommended for inclusion in your daily Yoga programme.
Benefits :
1. In Paschimatanasana, the muscles of the back and the spinal column get a stretch. Because of this, the muscles in these regions become flexible, especially the muscles at the back of the knees (hamstring muscles) and those of the waist. Due to the stretch along the spinal column, minor defects of the spine are eliminated. The blood circulation in this region improves and, consequently, the connecting muscles of the spine get a good supply of blood. This result in a better functioning of the nerve fibres coming out of the vertebrae.
2. Dally and extended practice of this Asana helps boys and girls with stunted growth to increase their height.
3. Owing to the positive pressure exerted on the abdominal region, particularly the lower one, the fat deposited there is trimmed. Unnecessary blood accumulation in this area is eliminated. Seminal weakness in young men and excessive menstruation in young women are corrected by the practice of this Asana.
4. Indigestion, constipation, gastric trouble, inflammation in the abdomen and general disorders of the stomach, intes tines, liver and kidneys are prevented by the date practice
of this Asana. However, constipation may occur if this Asana is maintained for long, say for more than 5 minutes. To avoid this problem, you should perform Uddiyana Bandha (1.e. raising of the diaphragm) and Ashwini Mudra (1.e. Anal Contraction) intermittently while practising this Asana. The technique of practising Ashwini Mudra and Uddiyana Bandha is explained in Chapter Nos. 19 and 32 respectively.
5. Lumbago, sciatica and other painful conditions of the waist region are corrected by proper and daily practice of this Asana. This Asana helps prevent pain in the waist.
For more visit:-
https://fitnessallrounderr.blogspot.com


0 Comments