DHANURASANA (The Bow Pose)
Contraindications : Abdominal disorders such as ulcers, colitis, etc. and very stiff back.
Leading and Preparatory Practices : Some people find it difficult to attain Dhanurasana because of stiffness of the spinal column and joints or obesity. They should practise Poorva Dhanurasana for a few days followed by Sulabha Dhanurasana. After good practice of these, they can perform Dhanurasana more easily.
POORVA DHANURASANA (The Pre Bow Pose)
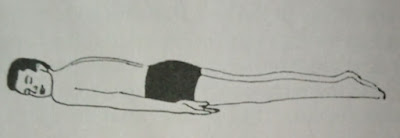
Starting Position : Lie down on the chest. Keep the hands by the side of the body. Keep the face on one side and the legs a little apart, relaxed (fig. 1).
Technique of Attaining the Asana : Keep the forehead on the floor. Keep the hands by the side of the body. palms facing upwards (fig. 2).
Fig. 1
Fig. 2
Fig. 3
Fig. 4
Releasing the Asana : Come out of the Asana following reverse procedure, i.e. release the hands from the ankle joints and attain the position in fig. 3. Straighten the legs (fig. 2) and finally attain the starting position (fig. 1).
Practice : Maintain the Asana for 3 to 5 breaths and perform 3 to 5 such rounds.
SULABHA DHANURASANA (The Easy Bow Pose)
Go into the final stage of Poorva Dhanurasana as described above. Let there be some distance between the knees. Now keeping the spinal column and body relaxed, start taking the legs upward and backward. During this operation, since the hands hold the legs firmly, the hands are also pulled backwards. Thus, there is a tug-of-war between the hands and legs. hands do not let the legs go and the legs try to tow the hands back. Owing to this process, the upper portion of the body (i.e. the head and chest) and the lower portion of the body (viz. knees and thighs) are automatically raised (fig. 5).
Fig. 5
Fig. 6
Releasing the Asana : Let the ankles come down a little and then let the thighs and abdomen come down (fig. 5). Next, relax the legs below the knees, which will bring down the thighs, knees, chest and head. Rest the chin on the floor (fig.4). Release the grip at the ankles and bring down the hands (fig.3). Rest the shins and toes on the floor (fig. 2). Finally, turn the face to one side and relax the entire body (fig. 1).
Practice : In the beginning, maintain the Asana for 3 to 7 breaths and perform 3 to 5 rounds.
DHANURASANA (The Bow Pose)
Starting Position : Lie down on the chest. Keep the hands by the side of the body. Keep the face on one side. Keep the legs comfortably near each other (fig. 7).
Fig. 7
Fig. 8
Fold the knees, bringing the knees together and the heels close to the buttocks (fig. 9).
Fig. 9
Raising the head, keep the chin on the floor. Hold the ankles with hands, keeping the four fingers on the outside and the thumb on the inside. The palms are so curved as to obtain a firm hold on the ankles (fig. 10).
Fig. 10
In this process, the upper portion of the body (1.e. the head and chest) and the lower portion of the body (i.e. knees and thighs) are automatically raised (fig. 11).
Fig. 11
Fig. 12
for some time, it is most important to ensure that the breathing goes on normally.
Eyes and Attention : Close the eyes, practise differential relaxation and then do Pranadharana.
Releasing the Asana : Let the ankles come down a bit and also let the groins and abdomen come down. Next, relax the shins. This will lower down the thighs, knees, chest and head. Then keep the chin on the floor. Release the grip on the legs and bring down the hands. Rest the shins and toes on the floor. Finally, turn the face to one side (opposite to that in the starting position) and relax the entire body.
Practice : In the beginning, maintain the Asana for 3 to 5 breaths and for 3 to 5 rounds. Afterwards, you may maintain it for half a minute to one minute (approx. 8 to 15 breaths) and perform 3 such rounds.
Probable Mistakes
- There is a tendency to hold the breath, raise the eyebrows, pull the legs and fold the hands at the elbows.
- Using force and jerky movements for attaining the final stage and main- taining it.
Benefits :
Correction
- Consciously check such tendencies. Breathe normally and naturally with a relaxed face. Keep the hands straight throughout and let the legs pull them backward.
- Scrupulously follow the correct technique of the Asana and go for it smoothly and according to your capacity.
1. With regular practice of this Asana, the spinal column becomes flexible. The problem of 'round back’ is also overcome.
2. Vertebral muscles become flexible and strong. The blood circulation therein is improved and the nerves in the region are activated.
3. Minor displacements of the vertebra and the consequent pressure they exert on the nerves are corrected.
4. Problems of the waist and neck because of improper blood circulation and disuse atrophy are overcome with the practice of this Asana.
5. Owing to the stretching of the intercostal muscles, the contraction and expansion of the chest become easier and respiration is improved.
6. Owing to the stretching of the muscles of the abdominal wall, their flexibility increases. The fat deposit on the abdomen diminishes and the girth is reduced.
7. In this Asana, since all the body weight rests on the stomach, the muscles there are stretched, the blood circulation improves and as a consequence, the digestive and excretory systems improve.
8. This Asana can be used as a curative measure for indigestion, constipation, gas trouble, etc.


0 Comments